หลายท่านประสบปัญหาในการติดตั้งและใช้งาน(ผมก็เช่นกัน) ดังนั้นผมจึงเขียนบันทึกไว้เบื้องต้นสำหรับติดตั้งและแก้ปัญหาสำหรับการใช้งาน GitKraken CLI ครับ
ติดตั้ง GitKraken CLI
Install on macOS (Homebrew):
$ brew install gitkraken-cli
สำหรับบางท่านอาจใช้ oh-my-zsh ซึ่งจะมี alias ที่ conflict กับ gk เราสามารถแก้ได้ด้วย
# temporary (ชั่วคราว)
unalias gk
source ~/.zshrc

# permanent (ถาวร, แนะนำ) 👍
echo "unalias gk" >> ~/.zshrc
source ~/.zshrc
หรือสามารถอ่านวิธีดาวน์โหลดบน platform อื่นได้ใน GitHub
ทดสอบการใช้งาน GitKraken CLI เบื้องต้น
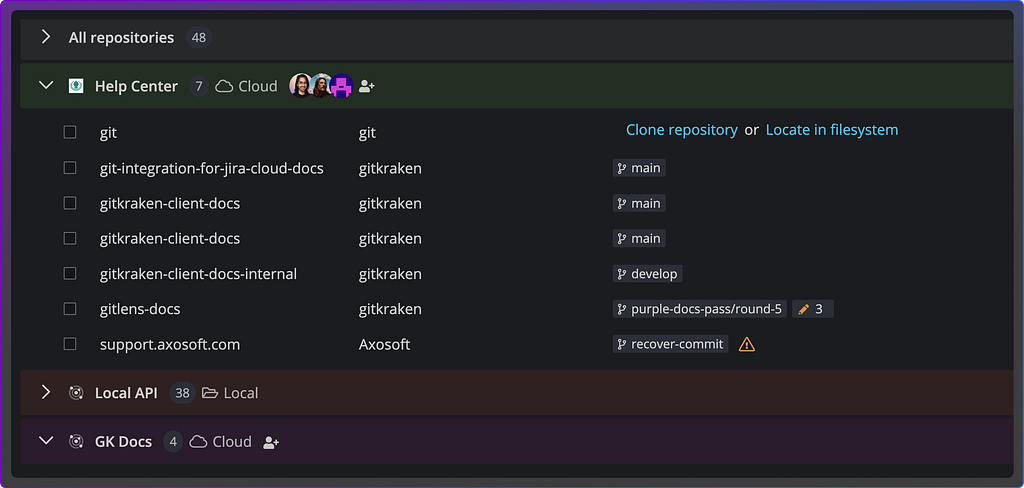
เบื้องต้นการใช้งาน เช่น ดู graph ของ repo จาก cli ไม่จำเป็นต้อง login ก็ได้ครับ แต่เพื่อประสบการณ์ที่ดีที่สุดก็ login ครับเพราะมีบางกรณีที่ผมสร้างพวก workspace ไว้ด้านบนก็สามารถ clone workspace ลงมาได้เลย (workspace คือกลุ่มก้อนของ repository ที่อยูในโปรเจค บางโปรเจคอาจมี 1 หรือมากกว่า 10 ก็ได้ สิ่งที่ทำให้ทำงานสะดวกมากแต่เอาไว้บล็อกหน้าค่อยมาลงลึกกันครับ
$ gk — คำสั่งเบื้องต้น
ถ้าเราทำทุกอย่างถูกต้อง ติดตั้งเรียบร้อย unalias สำหรับ macOS แล้วเราก็จะเจอหน้าตาประมาณนี้ครับ คำสั่งต่าง ๆ อาจมีเพิ่มได้ในอนาคต ผลลัพธ์ด้านล่างคือให้เห็นภาพรวมเฉย ๆ
$ gk

Usage:
  gk [flags]
  gk [command]
AUTHENTICATING
  auth         Authenticate with the GitKraken platform
  provider     Add or remove provider tokens
CORE COMMANDS
  ai           Use AI in the CLI
  graph        Display commit graph in current repository
  issue        Manage your issues
  mcp          Start a local MCP server for your favorite MCP client to interact with
  organization Manage your Gitkraken organizations
  work         Interact with your work. Alias: 'w'
  workspace    Interact with your workspaces. Alias: 'ws'
Additional Commands:
  completion   Generate completion scripts
  help         Help about any command
  setup        Display information about your current system configuration
  version      Print the version number of GK CLI
Flags:
  -h, --help   help for gk
Use "gk [command] --help" for more information about a command.
$ gk setup — แสดงข้อมูลการตั้งค่าในระบบ
เพื่อดูว่าเราได้ติดตั้งอย่างปกติสุขเราสามารถใช้คำสั่ง $ gk setu ได้
$ gk setup

               &&&&&     &&&&&&&      &&&&
             &&&&&&    &&&&&&&&&&&    &&&&&&
           &&&&       &&&&&&&&&&&&&&      &&&&
         &&&&       &&&&&&&&&&&&&&&&&       &&&&
    &&   &&&      &&&&&&&&&&&&&&&&&&&&&       &&&  &&
   &&&  &&&      &&&&&&&&&&&&&&&&&&&&&&&       &&& &&&
   &&& &&&      &&&&&&&&&&&&&&&&&&&&&&&&&      &&& &&&&
  &&& &&&       &&&&&&&&&&&&&&&&&&&&&&&&&       &&& &&&
  &&& &&&        &&&&&&&&&&&&&&&&&&&&&&&        &&& &&&
  &&& &&&           &&&&&&&&&&&&&&&&&           &&& &&&
  &&& &&&           &&&&&&&&&&&&&&&&&           &&& &&&
   &&& &&&         &&&  &&&&&&&&&  &&&         &&& &&&
   &&&& &&&        &&&&&&&&&&&&&&&&&&&        &&& &&&&
    &&&& &&&&        &&&&&&&&&&&&&&&        &&&& &&&&
      &&&&&&&&&       && &&&&&&&& &&      &&&&&&&&&
       &&&&& &&&&&    && &&&  &&& &&    &&&&& &&&&&
          &&&&& &&&&&&&& &&&  &&& &&&&&&&& &&&&&
             &&&&&  &&&& &&&  &&& &&&&  &&&&&
               &&&&&&&&&&&&&  &&&&&&&&&&&&
                   &&&&&&&&&  &&&&&&&&

Welcome to the Gitkraken CLI, ayuthmang!

License: GitKraken Pro
232 days of GitKraken Trial remaining - Upgrade now: https://gitkraken.dev/purchase/checkout
Default workspace: Standalone
Git binary found: ✓
CLI version: 3.1.49
$ gk auth — เข้าสู่ระบบ/ออกจากระบบ
ลอง login ดูด้วยคำสั่ง gk auth login เมื่อรันตัวจะมี link ให้ auth กับ GitKraken website จากนั้นเราก็ copy code ใส่
$ gk auth login

gk auth login
A browser will open with instructions to follow.
If the browser does not open, use this url: https://gitkraken.dev/login?source=gitkraken_cli
It is taking longer than expected...
Please enter your token code: <YOUR_CODE>

# เมื่อ login สำเร็จจะได้ข้อความ welcome กิ๊บเก๊แบบนี้ ✨
Welcome to GitKraken CLI, ayuthmang
หากท่านอยากจะ login ก็สามารถใช้คำสั่ง
$ gk auth logout
$ gk provider — เชื่อมต่อกับผู้ให้บริการอื่น
แน่นอนว่าเราทำงานโดยใช้ provider อย่าง GitHub, Bitbucket, GitLab หรือ self-hosted ของที่ทำงานท่าน ในที่นี้ผมขอยกตัวอย่างการต่อ GitHub นะครับ
gk provider add github
A browser will open with instructions to follow.
If the browser does not open, use this url: https://api.gitkraken.dev/v1/provider-tokens/github/auth-callback?state=37FxUPNiUCfV4GrjEnUY6d9lsVd
Press 'Enter' when you have finished: <YOUR_TOKEN>
Saved!
เมื่อเราลอง list provider เราจะเห็นผลลัพธ์ดังนี้
$ gk provider list

┌───────────────────────┐
| NAME      | CONNECTED |
| --------------------- |
| Azure     | ✗         |
| Bitbucket | ✗         |
| GitHub    | ✓         |
| Gitlab    | ✗         |
| Jira      | ✗         |
| Linear    | ✗         |
└───────────────────────┘
เช่นเดียวกับกันการลบ เราสามารถลบ provider ด้วยคำสั่ง
gk provider remove github
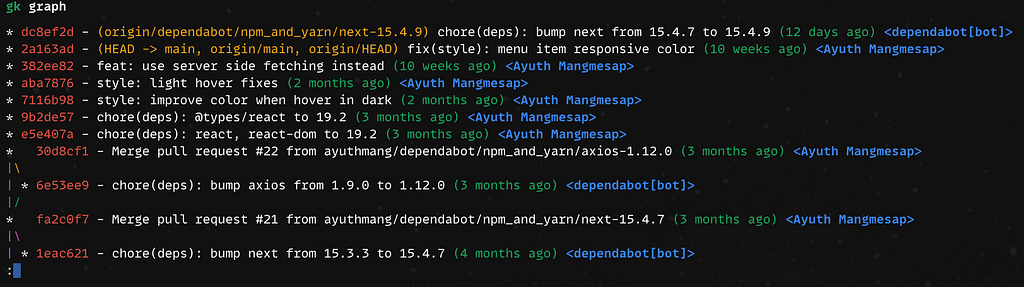
$ gk graph — แสดงกราฟของโปรเจค
โดยปกติแล้วเราสามารถแสดงกราฟของ repository ได้ด้วยคำสั่ง
$ git log --graph --oneline

สำหรับใน gk cli นั้นเราจะใช้คำสั่ง gk graph ได้
หรือถ้า repository นั้นมันมีประวัติค่อนข้างเยอะและมีหลายคนทีมที่ทำงานร่วมกันก็สามารถเปิดบน GitKraken Desktop ได้ด้วยคำสั่ง
$ gk graph --gitkraken <PATH>

# examples
$ gk graph --gitkraken . # or current directory
$ gk graph --gitkraken /path/of/the/project
GitKraken Workspace
Workspace เป็นอีกหนึ่งอย่างที่ดีมากสำหรับโปรเจคที่มีหลาย repository กล่าวอย่างง่ายคือเราสามารถรวมหลาย repo มาอยู่ใน workspace ได้ ทำให้สะดวกมากในการที่จะ clone ลงมาหรือแชร์ให้กับ team
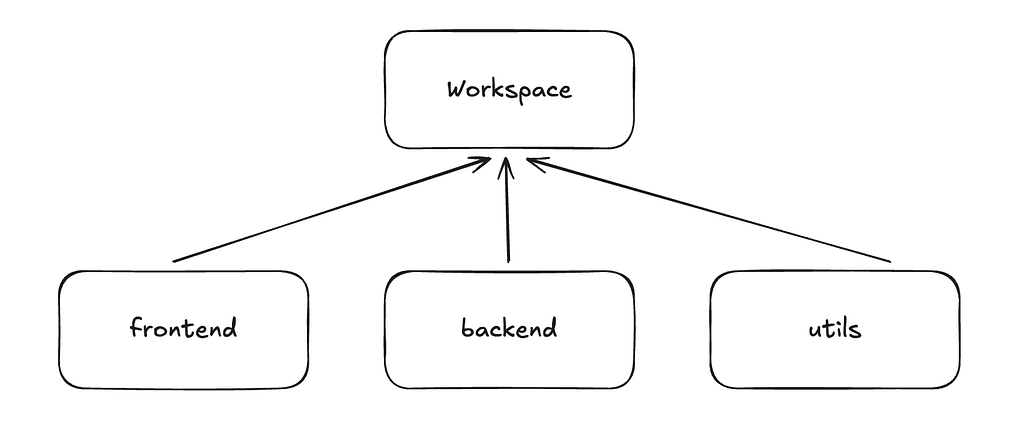
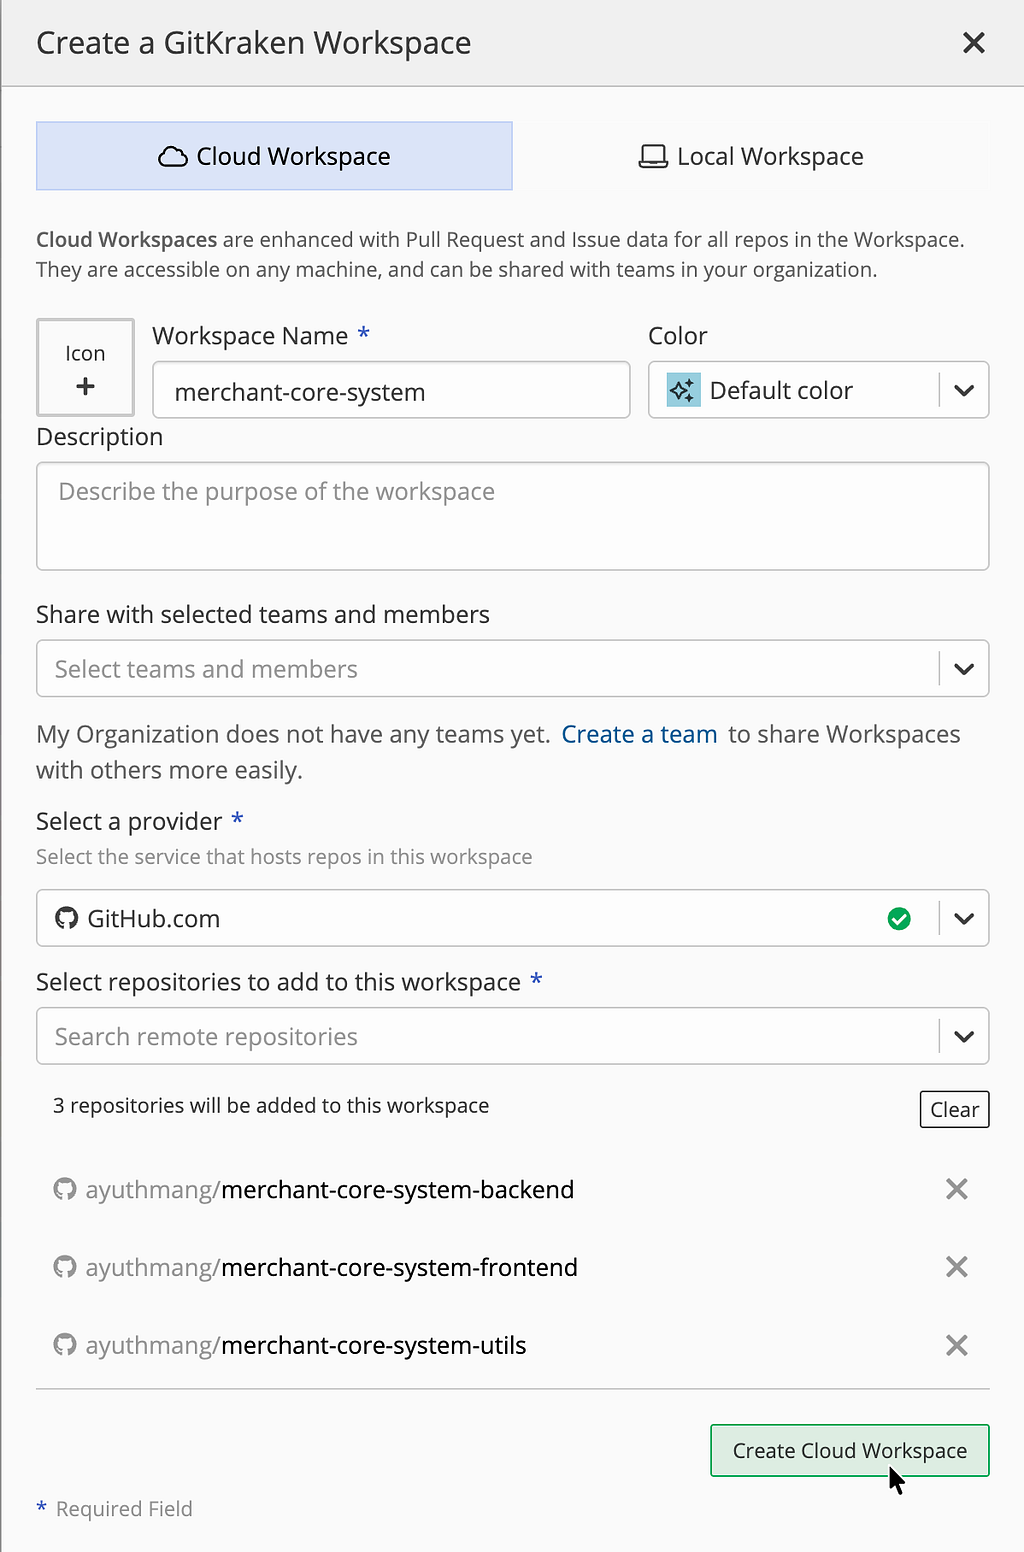
ในตัวอย่างนี้เราจะสร้าง workspace ที่ชื่อ merchant-core-system และมีโปรเจคอยู่ภายใน 3 repo ได้แก่
- merchant-core-system-frontend
- merchant-core-system-backend
- merchant-core-system-utils
$ gk ws create — สร้าง workspace ของเรา
ในการสร้างสามารถสร้างผ่าน GitKraken CLI, GitKraken Desktop หรือบนเว็บ GitKraken.dev
ตอนสร้างผมสร้างไม่สำเร็จใน CLI ครับไม่รู้เกิดจากสาเหตุอะไร error message ไม่ค่อยเคลียเท่าไร ผมแนะนำให้สร้างผ่าน GitKraken Desktop หรือ GitKraken.dev ครับเพราจะมี UI ค่อนข้างดีทำให้เราแค่คลิกไม่ต้องหามาใส่เองทั้งหมด

$ gk ws list — ลิสต์ workspace ทั้งหมด
แสดง list ของ workspace ทั้งหมดที่เรามี
$ gk ws list
┌──────────────────────────────────────────────────────────────────┐
| NAME                 | # OF REPOS | TYPE  | SHARED WITH | ACTIVE |
| ---------------------------------------------------------------- |
| merchant-core-system | 3          | Cloud | Personal    |        |
└──────────────────────────────────────────────────────────────────┘
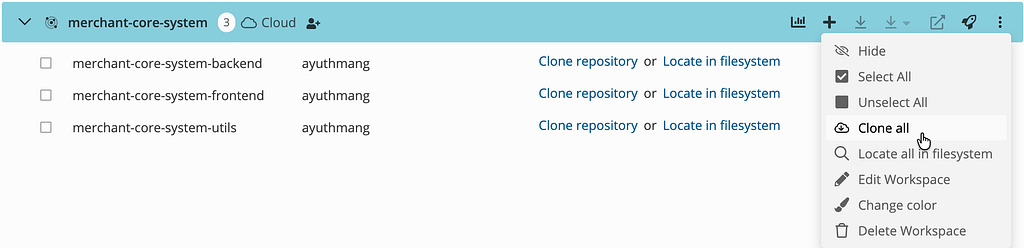
แน่นอนว่าถ้าเราสร้างสำเร็จและเราเลือก type เป็น cloud มันจะแสดง list บน desktop app เช่นกัน

$ gk ws clone — โคลน workspace ทั้งหมดลงมา
เช่นเดียวกัน ถ้าเราสร้าง workspace สำเร็จ เราสามารถ clone มาได้ผ่าน cli หรือเปิด GitKraken Desktop และ clone ลงมาได้
$ gk ws clone merchant-core-system .
Cloning merchant-core-system-frontend --------------------------   0% | 1.001s
Cloning merchant-core-system-utils -----------------------------   0% | 1.001s
Cloning merchant-core-system-backend ---------------------------   0% | 1.001s
ถ้าจะ clone ผ่าน desktop app ก็ได้ (แนะนำ)
$ gk ws info <workspace name> — ดูละเอียดเกี่ยวกับ ws ที่เลือก
ค่อนข้างตรงไปตรงมาครับ แสดงรายละเอียดเกี่ยวกับ workspace name ที่เลือก
$ gk ws info merchant-core-system
NAME                 | DESCRIPTION | TYPE  | # OF REPOS | SHARED WITH | ACTIVE
------------------------------------------------------------------------------
merchant-core-system |             | Cloud | 3          | Personal    | ✓
Repositories
NAME                          | PATH
------------------------------------
merchant-core-system-backend  |
merchant-core-system-frontend |
merchant-core-system-utils    |
เบื้องต้นประมาณนี้ครับ ในบล็อคถัดไปมีอะไรน่าสนใจจะมาเขียนให้ในโอกาสหน้า
สุดท้ายนี้ ถ้ายังไม่มี GitKraken Account?
- สำหรับนักศึกษาหรือบุคลากรคุณสามารถไปยืนยันตัวตนและรับสิทธิ์ใช้ฟรีได้ที่ https://education.github.com/pack
- ท่านสามารถใช้ referal link นี้เพื่อรับส่วนลด 50% ได้หรือท่านจะไม่ใช้ก็ได้เช่นกัน
References
ติดตั้งและใช้งาน GitKraken CLI was originally published in Ayuth’s Story on Medium, where people are continuing the conversation by highlighting and responding to this story.